Showing posts with label no sew. Show all posts

23 October 2011

DIY: instant drapey scarf


reblog

e a s y ][ 20 minutes
cost: free, ideally
shop at: your house
read: the instructions once though before you get started

I got a handmedown henley from a family friend, wore it a few times, then I realized it was really unflattering. Yet really soft. I Absent mindedly made a few cuts, removing the buttons and slicing sleeves. I didn't rock it til much later, when I became more of a risk-taker with my outfit choices. I think you guys will love this!

SUPPLIES

- 1 long sleeve tee
(hopefully it's a color or print you like, and soft fabric a plus)
- scissors

0. HOW TO GET YOUR TEE FO' FREE: wander around your house and ask brothers, sisters, parents, whoever -- if they have an old long sleeve shirt they don't wear or like anymore. Or, even easier, maybe you have one of your own.

1. Cut off the collar and tag. If it has buttons, you can leave those or snip them off.

2. Starting below the neckline, make a long slit that goes 1/3 or so down the front of the shirt. Don't cut the back of the shirt.

3. Sleeves: starting at the cuff, make one cut up the length of the sleeve. Repeat on other sleeve.

4. Done! Here's a visual if you're confused.

[link]

5. Stick your head through what used to be the torso/chest part of the shirt. You can wear it sleeves hanging down, wrapped around, angled, exposed seams, inside out…sometimes I wear mine as an impromptu hood. I bet it could work as a hair-wrap, too! There isn't a wrong way to wear it.

TIP: I've found that smaller sized shirts (hence why snagging a younger sibling's shirt works so well) and thin/tissue knit jersey work really well. Don't flip out about it being "perfect". No such thing. Once it's draped around your neck it'll feel fab :)

ALTERNATIVE IDEAS: Regular tees, or 3/4 sleeves, will probs work too, but they'll be a little different. You could try ripping/snipping funky holes in the shirt to create a pattern. There's a million ways to cut it, as well. Endless options!

[feel free to use my photos in your sets! but please don't edit w/o asking. If you make a scarf of your own, send me a photo!]

be sure to check out my other projects!


♥ I worked really hard on this set. It took a long time to prepare.
I wrote out these instructions and took the photos.
So if you see this anywhere else, it's not the original.
10/10/10

30 August 2011

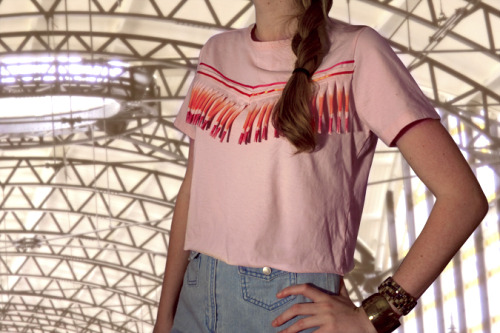
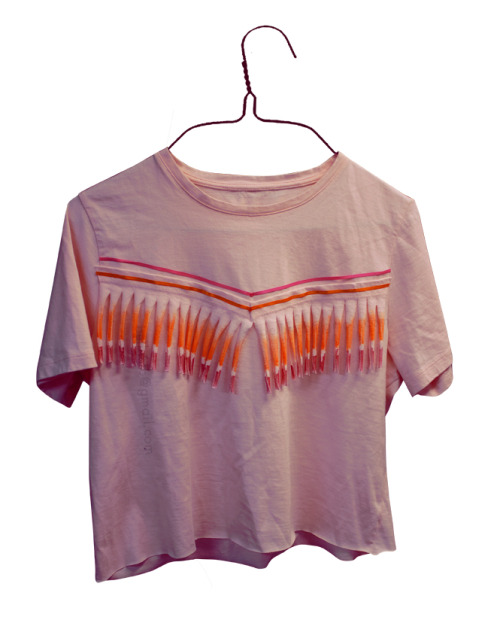
DIY: chevron fringe tee


reblog on tumblr | hype on lookbook

e a s y ][ 1-2 hours
cost: $10-20
shop at: your house, craft or fabric stores
read: the instructions once though before you get started.

Fringe is a really fun effect but I imagine it can be kind of intimidating if you've never tried it before. I promise this is a super easy project with big results, and would be fun by yourself, or with a group! It's also mildly eco-friendly, as each shirt is made from just one shirt, and minimal supplies, with very little waste.

SUPPLIES
- light colored t-shirt that's at least little too big for you.
(most craft and fabric stores have tees in youth and adult sizes)
- fabric glue
(beacon fabri-tac is a good brand)
- fabric markers or sharpies
- ribbon
- scissors
- ruler
- pencil
- piece of cardboard
(newspaper or a notebook would work too)
- flat space to work

1. Plan what colors you want to use before you buy supplies. The shirt I found in my house was light pink, so I decided to use pink and orange fabric markers, and pink and orange ribbon. I think fewer colors show off the fringe, but if you're color crazy, do your thing. Or, if you're not color crazy, you could even skip the steps about marker and/or ribbon. If you don't like fringe, this isn't a project for you. But maybe a friend or relative would like one?


2. Cut any tags out of the shirt.Try on the shirt and mark where your belly button is with a pencil. Take off the shirt and lay it flat. I recommend that you cut off around 4" from the bottom of the t-shirt. Four inches allows for pretty good looking fringe, but if that makes the tee too much of a belly shirt, or you want to play with fringe length, adjust as you like! The more you cut off from the bottom, the shorter the shirt will be.


3. Set the main part of the tee aside. Grab the bottom piece and place it in front of you, with the seam at the top. Using the fabric markers, add stripes of color to both sides. They don't have to be perfect, texture and randomness is a good thing here!


4. Cut lines every 1/2" along the piece, all the way across. You can wing it, or draw lines with a ruler and pencil. Pulling down on the 1/2" strings will cause them to roll, creating the awesome fringe effect.


5. Cut the fringe into two pieces, where the sides of the t-shirt used to be. You should have something that looks like this:


6. Now to create the chevron. Grab the fringe piece you want to use on the front of the shirt. Fold it onto itself, color facing in.


7. This part is a bit tricky, but take your time, you'll get it! Practice with a strip of paper if you need to. Fold it back flat, creating a little triangle behind it in the center.


8. The whole piece should look like the edge of an obtuse triangle. Put fabric glue in between the center's folds and let it dry for a bit. Then, pin the fringe where you want it to be on the shirt. Try it on to get a better visual. You can hold up the fringe and mark the shirt if you don't have pins.


9. Slide a piece of cardboard into the shirt to keep the glue from going everywhere. Trim the ends, remove the pins. Apply glue to the back of the seam to attach the fringe to the shirt, keeping an eye on placement. Once it's on there, press it down.


10. Using the same folding and gluing techniques, you can attach ribbon to the shirt.


11. I used the extra fringe and ribbon on the back of my shirt. I decided to put a straight line higher up, but you could do another chevron.


12. Done! Time to find some breeze and put your fringy tee into action!


TIP: Fabric glue is perfect because once it dries completely, it's machine washable. If you're feeling fancy, you could definitely sew instead.

ALTERNATIVE IDEAS: If you use a tee that is way big, you'll get a cool drapey poncho look. You could also play with cutting the neckline or sleeves, all the usual things that happen when you put scissors near a t-shirt.

Be sure to check out my other projects!

If you make one, feel free to post a photo on the September Girls Do So Much fan page!

DIY #16
♥ I worked really hard on this tutorial. It took a long time to prepare.
I wrote out these instructions and took the photos.
So if you see this anywhere else, it's not the original.
8/30/11

04 June 2011

DIY: imperfectly perfect tiedye


IMPERFECTLY PERFECT TIEDYE
m e d i u m ][ chunks of time over 2-3 days
cost: $25+
shop at: your house, a craft store, online, clothing stores
read: the instructions once though before you get started

This is going to be an big compilation of advice, and less of a step by step tutorial.
It's a big project, so consider gathering your friends up to do this one, you can split the costs & it's a really great way to spend a few afternoons.

Why do I know so much about such a hippie-associated craft? I took a class in HS, we did this for a month. I'm kind of a pro? x)

SUPPLIES

- Procion MX dye
- Bag of Soda Ash
- Squirt Bottles (around 5-10 is ideal)
You can learn about & buy all of the above here:
http://www.dickblick.com/products/procion-mx-fiber-reactive-cold-water-dye/
Or call your local craft stores & ask about it
Be sure to read all the labels + mixing details.

- rubber gloves
- bag of rubber bands
- bucket or tub (metal, plastic, whatever you can find)
- measuring pitchers, like you use for cooking, that are ok to get dirty
- Sink or outdoor hose you're allowed to get messy by
- hot water
- cold water
- open area to work (yard, pavement, classroom…)
- clean plastic garbage or grocery bags
- masking tape & marker
- washing machine/dryer/whatever you usually use

- 85-100% white cotton items you want to dye & decorate
(tees, tanks, dresses, the list is endless! just check the item's info tag before buying & dying. buy a few, once you're into this, you want to make MORE)

ATTITUDE

If you're obsessive over details, mellow out. I'm a detail-oriented graphic design student, so I can relate. Don't worry, this is going to be rad.

The best tie dye happens when you just relax and GO FOR IT. That's what makes it fun, and awesome. You can't talk to the materials and be like "omg be perfect! why aren't you doing what I exactly pictured? waHHH!" They don't listen.

Dye does wonderful things while you aren't looking, and in turn, makes you look talented with next to no effort.

COLOR CHOICE & DIRECTION

At $3 a container, you probably can't buy 50zillion colors of dye powder. That's ok! Hopefully in kindergarten they taught you that colors mix to make other colors. That's still true, for those of you that haven't checked recently.

$10 color budget? Get a blue, yellow, and reddish-pink or red. You can't go wrong. Those three colors will make a wide range and keep all of your friends happy.

A little more to spend? Each of you can pick out an additional color that you're in love with.

Before finalizing your color choices, think of what sort of item you had in mind.
Do you want a traditional million-color hippie tee?
An edgy dark skirt?
Or a tone-on tone celebrity dolman?

Picture what you want & say to yourself, what colors are in it?
Those are the colors you should buy.

More colors looks youthful, whereas a few colors looks more refined.

BE WARY OF & USE MINIMAL BLACK DYE. IT OVERPOWERS OTHER COLORS ALMOST INSTANTLY. If you're going to use it, build up squirt by squirt and keep an eye on it. It's not chill like the other hues. x)


FOLDING/RUBBERBANDING TECHNIQUES + SCHEDULE

Basically, rubberbands make sections,
and in each section, between 2 rubberbands,
is where you put the dye.

2 or more colors of dye is do-able, but keep it basic for your first go round.
Get a feel for the materials and results, then go crazy!

In general, I find that putting more dye than you think you need is the way to make sure you totally saturate your item.

Here is a great guide for different ways to band things up, consider printing it out:
http://www.prochemical.com/directions/Folding.htm

You can apply these basic techniques all over complex items, ie, swirls on the hood + main part of a sweatshirt, and stripes on the sleeves.

As far as scheduling goes, I suggest doing this over 2 or 3 days, and build up your confidence.
Day 1: "what the heck are we doing, everyone?" "ohh, that does this…"
Day 2: "wow THAT CAME OUT COOL. let's do that, but do this too…"
Day 3: "we're old pros. do thisthisthis. bam"

THE ACTUAL PROCESS

Def def def look over instructions on the materials, for water/material ratios, and toxicity warnings. x)

PART 1

1. mix the soda ash + hot water in a big bucket or tub. soak all of your cotton items in there for at least 30 minutes. remember how your day camp shirts faded after like, 3 days? this will prep the fabric + make colors last longer wash after wash.

2. while you're waiting, put on gloves + mix a little dye powder with cold water in a measuring pitcher. mix it up, and use a funnel to pour it into a squirt bottle. clean everything & repeat for the next bottle. you can mix different colors together before you put it in the squirt bottle. get your range ready!

3. take off your gloves, and with clean hands, or new gloves, ring out the salt water of your items. rubberband up each of your items.

4. put your dye-gloves back on, and apply dye with the squirt bottles onto your items.

5. once you're done putting on all the colors you want, keep the rubberbands on it and wrap up each item individually (things like a set of socks can stay together, haha) in a piece of plastic bag, and masking tape it shut, wrapping it around, or whatever you feel seals it. write your name on it if you're in a big group.

6. ok this is the hard part. once all your items are dyed + wrapped + marked, you gotta wait. ideally, 12-24 hours. this gives the color lots of time to seep into the fabric + stay put.

PART 2

7. after 12-24 hours, unwrap one item at a time near a sink or hose. this is your first chance to go "OOOH, AHHH, AWEEESOME!" run the item through cold water until the water runs clear and no more dye runs off with the water. repeat for each item (including the oohs and ahhs! haha)

8. let your items dry outside a bit, to make them mobile. then, take them home, and for the first wash, wash everything individually, with detergent as usual. (again, 2 socks can be washed together, haha) dry in the dryer. every wash after that? they can go in with your usual bright clothing. the color is set.

9. still not satisfied with one of your items? work with it again, dye some more, going over the colors that are still there! keep messing with it, it's worth a shot.

10. repeat until you run out of things to dye, or run out of dye.


This guide is helpful if you're interested in dying your own shirt to make a doodle tee like mine.

Have a photo of something you want to dye-copy, and need color advice? PM me, I'll try to help. (:

be sure to check out my other projects!

♥ I worked really hard on this set. It took a long time to prepare.
Big thanks to the websites I linked to, and one of my high school art teachers.
I wrote out these instructions.
So if you see this anywhere else, it's not the original.
9/2/10

15 January 2011

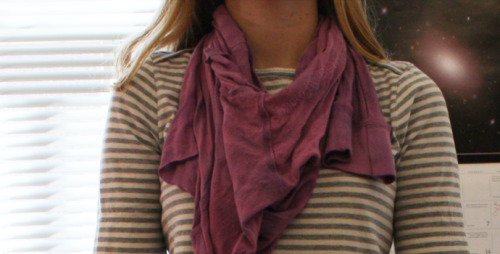
DIY: instant circle scarf


e a s y ] [ 1-2 hours

cost: $10 or less per scarf
shop at: a fabric store (JoAnn Fabrics has a lot of locations)
read: the instructions once though before you get started

This 'so easy it's dumb' tutorial was inspired by a friend of mine.
This can be a lovely lightweight to midweight scarf.
No knitting needles or sewing skills required.

SUPPLIES

- transportation to a fabric store
- fabric store clerk
- washing machine and dryer

1. Arrive at the fabric store, and find the knit jersey. (t-shirt fabric, basically) It's on the bolts like the other fabrics.

2. You want the kind that is connected to itself, creating a tube.

3. If you can not find it, or are uncertain if it's in tube form, ask a clerk to help you. They usually know about fabric, and are super sweet and helpful.

4. Pick out the color you want, pick up the bolt, and carry it to the cutting counter.

5. Tell the clerk at the counter you'd like 1/2 a yard. This will give you a decently cozy scarf. You can always experiment with amounts if you make another.

6. Done! The clerk will give you a receipt with your fabric, and then you can go check out at the register area. Or, you can wander around for a bit. Fabric stores are filled with interesting things!

7. Once you're out of the store, toss on your new scarf and play with it, or do a parking lot initiation dance for it. x)

8. Once you're back home, it's a good idea to wash the scarf, to let the fabric shrink/adjust a bit. And to clean it up, haha.

9. Play with it! Stretch it, let the edges roll, wrap it around your neck a few times, you'll figure out how to style it really quickly!

TIP: (requires basic sewing skills) If you have fabric (that doesn't fray, or you can hem) you'd like to use for a scarf, but it's not in tube form, cut out a long rectangle, and connect the two short ends together with a single seam.

ALTERNATIVE IDEAS: Cut a straight line underneath the sleeves of an old t-shirt. Bam. Circle Scarf. The size of the scarf will vary based on the size of the t-shirt.

Longer amounts of fabric (3/4 of a yard compared to 1/2) will create a more bulky scarf. Shorter amounts (i.e. 1/8 or 1/4 of a yard) will create a stringy, more necklace-like scarf.

A TIP FROM EMY: If you get a yard or longer, the scarf can double as a dress or top or skirt!

Be sure to check out my other projects!

DIY #11
♥ This was an easy one to make, but preparation always takes effort.
I wrote out these instructions.
So if you see this anywhere else, it's not the original.
1/15/11