Showing posts with label tip. Show all posts

18 July 2012

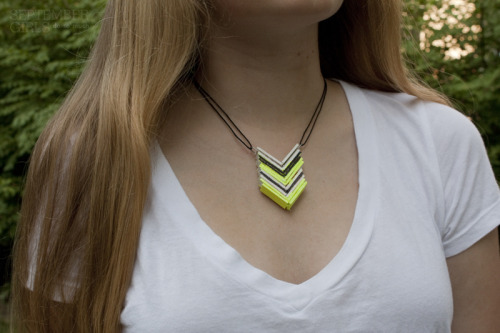
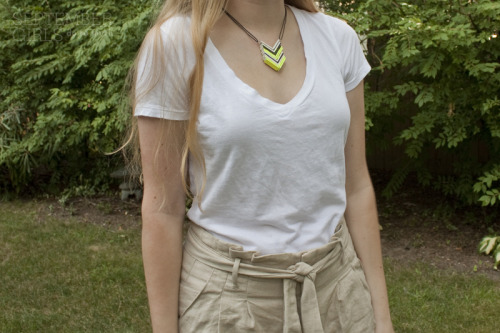
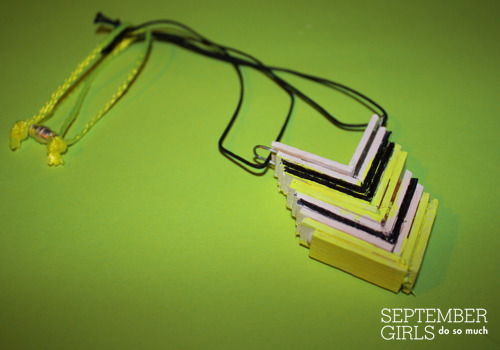
DIY: popsicle stick chevron necklace


reblog on tumblr


reblog on tumblr

e a s y ][ 1-2 hours
cost: $10 range
shop at: your house, your freezer, craft store
read: the instructions once though before you get started.

Myself, and a lot of other people apparently, have been keen on chevrons lately. So, how can one be on trend while enjoying summer treats at the same time? Here's the answer.

SUPPLIES

- 10 popsicle sticks
(from popsicles you've eaten, or fresh ones from the craft store)
- 2 paperclips
- pencil
- ruler
- scissors
- hot glue gun
(or another type of sturdy glue you have handy)
- newspaper or junk paper for spilling glue and paint on
- string or chain/jewelry making bits

optional supplies:
- sand paper
- box cutter or xacto knife
- white paint
- colored paint
- paintbrush
- sharpies

0. Soak the popsicle sticks in warm water for 5 minutes. This makes them easier to cut. If you're using popsicle sticks from actual popsicles, add a few drops of dish soap, as this also cleans them. Pat all of the sticks with a paper towel to get rid of excess moisture.

1. Measure three 1 inch sections on each stick, and mark. Be sure to trim off the rounded ends as well.


2. Cut the sticks using scissors. Sometimes it helps to go over your marks with a box cutter before you use the scissors. Don't worry if you mess up a few cuts, 10 sticks gives room for mistakes.


3. If you have sand paper, this is a good time to sand the edges where you cut. For both sides of piece, I ran it over coarse and then ran it over fine grain.


4. Once the pieces of popsicle stick have dried a bit more, apply white paint to the edges. This is especially helpful if your sticks are stained from, well, obviously, popsicles.


5. Using the hot glue gun, create an "L" shape with two of the stick pieces.


6. Applying more hot glue, layer on another piece.


7. And another. You are essentially creating lots of "L" shapes that nest into each other, so keep an eye on how you position them. Don't worry about being perfect, this necklace's look lends well towards the organic feel.


8. Continue layering until it is just about the right height. I used about 8 sticks' worth.


9. Glue two paper clips to the top. (This is where you'll attach the string)


10. Then, layer on the last two stick pieces. Let the pendant dry, carefully picking off any weird bits of glue.


11. You can use paint or sharpie to add a bit of zip to your necklace. Play around with string or chain and presto, you have a necklace! (Make sure it fits around your head and neck!)
reblog on tumblr

TIP: Hot glue works best when you let it heat up for a few minutes. If you use it too soon, it's in this weird state where it clumps and dries too quickly. Always work on a surface like newspaper, where it is ok to spill and drip. Also: seems dumb, but it gets really hot, which is hard to believe until it lands on your fingers. Speaking from experience here, haha.

ALTERNATIVE IDEA: Plain unpainted wood has a nice look to it, as it puts the focus on the form of the necklace. But, as always, color creates a nice effect if you pay attention to spacing and what distance people see the necklace from. Lots of colors together can look epic up close and then when you step back it can look muddy.

Be sure to check out my other projects!

If you make one, feel free to post a photo on the September Girls Do So Much fan page!

DIY #18
♥ I worked really hard on this tutorial. It took a long time to prepare.
I wrote out these instructions and took the photos.
So if you see this anywhere else, it's not the original.
7/18/12


23 October 2011

DIY: instant drapey scarf


reblog

e a s y ][ 20 minutes
cost: free, ideally
shop at: your house
read: the instructions once though before you get started

I got a handmedown henley from a family friend, wore it a few times, then I realized it was really unflattering. Yet really soft. I Absent mindedly made a few cuts, removing the buttons and slicing sleeves. I didn't rock it til much later, when I became more of a risk-taker with my outfit choices. I think you guys will love this!

SUPPLIES

- 1 long sleeve tee
(hopefully it's a color or print you like, and soft fabric a plus)
- scissors

0. HOW TO GET YOUR TEE FO' FREE: wander around your house and ask brothers, sisters, parents, whoever -- if they have an old long sleeve shirt they don't wear or like anymore. Or, even easier, maybe you have one of your own.

1. Cut off the collar and tag. If it has buttons, you can leave those or snip them off.

2. Starting below the neckline, make a long slit that goes 1/3 or so down the front of the shirt. Don't cut the back of the shirt.

3. Sleeves: starting at the cuff, make one cut up the length of the sleeve. Repeat on other sleeve.

4. Done! Here's a visual if you're confused.

[link]

5. Stick your head through what used to be the torso/chest part of the shirt. You can wear it sleeves hanging down, wrapped around, angled, exposed seams, inside out…sometimes I wear mine as an impromptu hood. I bet it could work as a hair-wrap, too! There isn't a wrong way to wear it.

TIP: I've found that smaller sized shirts (hence why snagging a younger sibling's shirt works so well) and thin/tissue knit jersey work really well. Don't flip out about it being "perfect". No such thing. Once it's draped around your neck it'll feel fab :)

ALTERNATIVE IDEAS: Regular tees, or 3/4 sleeves, will probs work too, but they'll be a little different. You could try ripping/snipping funky holes in the shirt to create a pattern. There's a million ways to cut it, as well. Endless options!

[feel free to use my photos in your sets! but please don't edit w/o asking. If you make a scarf of your own, send me a photo!]

be sure to check out my other projects!


♥ I worked really hard on this set. It took a long time to prepare.
I wrote out these instructions and took the photos.
So if you see this anywhere else, it's not the original.
10/10/10

30 August 2011

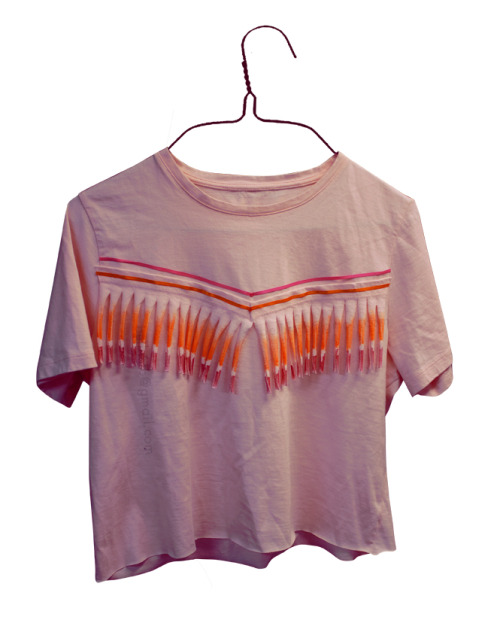
DIY: chevron fringe tee


reblog on tumblr | hype on lookbook

e a s y ][ 1-2 hours
cost: $10-20
shop at: your house, craft or fabric stores
read: the instructions once though before you get started.

Fringe is a really fun effect but I imagine it can be kind of intimidating if you've never tried it before. I promise this is a super easy project with big results, and would be fun by yourself, or with a group! It's also mildly eco-friendly, as each shirt is made from just one shirt, and minimal supplies, with very little waste.

SUPPLIES
- light colored t-shirt that's at least little too big for you.
(most craft and fabric stores have tees in youth and adult sizes)
- fabric glue
(beacon fabri-tac is a good brand)
- fabric markers or sharpies
- ribbon
- scissors
- ruler
- pencil
- piece of cardboard
(newspaper or a notebook would work too)
- flat space to work

1. Plan what colors you want to use before you buy supplies. The shirt I found in my house was light pink, so I decided to use pink and orange fabric markers, and pink and orange ribbon. I think fewer colors show off the fringe, but if you're color crazy, do your thing. Or, if you're not color crazy, you could even skip the steps about marker and/or ribbon. If you don't like fringe, this isn't a project for you. But maybe a friend or relative would like one?


2. Cut any tags out of the shirt.Try on the shirt and mark where your belly button is with a pencil. Take off the shirt and lay it flat. I recommend that you cut off around 4" from the bottom of the t-shirt. Four inches allows for pretty good looking fringe, but if that makes the tee too much of a belly shirt, or you want to play with fringe length, adjust as you like! The more you cut off from the bottom, the shorter the shirt will be.


3. Set the main part of the tee aside. Grab the bottom piece and place it in front of you, with the seam at the top. Using the fabric markers, add stripes of color to both sides. They don't have to be perfect, texture and randomness is a good thing here!


4. Cut lines every 1/2" along the piece, all the way across. You can wing it, or draw lines with a ruler and pencil. Pulling down on the 1/2" strings will cause them to roll, creating the awesome fringe effect.


5. Cut the fringe into two pieces, where the sides of the t-shirt used to be. You should have something that looks like this:


6. Now to create the chevron. Grab the fringe piece you want to use on the front of the shirt. Fold it onto itself, color facing in.


7. This part is a bit tricky, but take your time, you'll get it! Practice with a strip of paper if you need to. Fold it back flat, creating a little triangle behind it in the center.


8. The whole piece should look like the edge of an obtuse triangle. Put fabric glue in between the center's folds and let it dry for a bit. Then, pin the fringe where you want it to be on the shirt. Try it on to get a better visual. You can hold up the fringe and mark the shirt if you don't have pins.


9. Slide a piece of cardboard into the shirt to keep the glue from going everywhere. Trim the ends, remove the pins. Apply glue to the back of the seam to attach the fringe to the shirt, keeping an eye on placement. Once it's on there, press it down.


10. Using the same folding and gluing techniques, you can attach ribbon to the shirt.


11. I used the extra fringe and ribbon on the back of my shirt. I decided to put a straight line higher up, but you could do another chevron.


12. Done! Time to find some breeze and put your fringy tee into action!


TIP: Fabric glue is perfect because once it dries completely, it's machine washable. If you're feeling fancy, you could definitely sew instead.

ALTERNATIVE IDEAS: If you use a tee that is way big, you'll get a cool drapey poncho look. You could also play with cutting the neckline or sleeves, all the usual things that happen when you put scissors near a t-shirt.

Be sure to check out my other projects!

If you make one, feel free to post a photo on the September Girls Do So Much fan page!

DIY #16
♥ I worked really hard on this tutorial. It took a long time to prepare.
I wrote out these instructions and took the photos.
So if you see this anywhere else, it's not the original.
8/30/11

26 August 2011

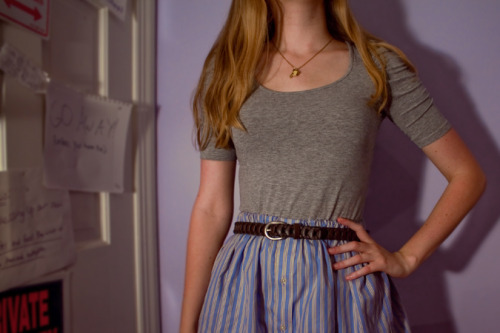
DIY: shirt skirt


reblog on tumblr | hype on lookbook

m e d i u m ][ 1-2 hours
cost: $4 for thread & elastic
shop at: your house, craft or fabric stores
read: the instructions once though before you get started. also consider referring to my Le Sac Dress tutorial, as it uses similar techniques.

The perfect use for an old button down shirt from your boyfriend, lover, the kid across the dorm hall who you harass, OR good ol' dad, or grandpa joe. Or sketchy Uncle Goodwill.

You only have to know how to sew a straight line. Plus, you don't have to hem this skirt! Yesss. And it's a great unique shape. Side slope!

I wear this one like I wear my elastic high waist skirts, at my natural waist with a shirt tucked in.

SUPPLIES
- button down shirt in a male size, hopefully it has some length to it
- sewing machine that can do a straight stitch OR be tough & sew by hand
- iron
- scissors
- ruler
- safety pins
- package of 1/2 inch elastic
- thread in a color that goes with the shirt

1. Button all the buttons. Cut straight across both layers of the shirt, under the sleeves. Do not try to cut through a button.


2. Now you have the bottom of a shirt. Stitch down the placket, buttons rightside up. This prevents awkward gapping when you wear the skirt. Only sew the top layer of the shirt. Do not stitch over buttons, the needle will break. A broken sewing machine is a sad one.


3. Lay the shirt tube on an ironing board, wrong side out. Fold & iron the top edge of the shirt down so it makes a 3/4 inch skinny rectangle around the top of the tube opening. This will be the tunnel where the elastic goes. Pin it down & it'll stay in place better.


4. Using a straight stitch, sew around the circle close the lower edge, but do not sew it shut completely. Leave a 1 inch opening. The gap is where the elastic will enter. Keep an eye on things and check your work every so often, so you don't accidentally sew through both layers of the skirt!


5. Cut a piece of elastic a few inches shorter than your waist. For instance, if you have a 26 inch waist, cut a piece that is 21-23 inches. Styles of elastic vary, so you may have to tinker with it again later to get the right fit.

6. Attach one end of the elastic to a safety pin. Pin the other end somewhere near the tunnel, so it will not get lost in the tunnel. Push the elastic through the top fabric tunnel. It will gather and make cute little bunches. Take your time.


7. When the elastic meets, remove the safety pins carefully, make sure the elastic is not twisted, and sew the ends together. Go over it multiple times.


8. Try on the skirt to see if it fits. The elastic should feel snug but not painfully tight. Re-sew the elastic tighter if needed.

9. Tuck the elastic fully into the tunnel. Sew the fabric tunnels shut along the bottom edge where the other stitches are, going over it a few times.

10. Turn the skirt right side out, and you're done!


TIP: I like to leave the seam tag hanging as a bonus "this used to be a shirt!" detail. But you can cut yours out if you like.

ALTERNATIVE IDEA: This tutorial could be modified to make a top, or plenty of other things, depending on what kind of shirt you use. Cook up some ideas of your own, if you feel like it!

Be sure to check out my other projects!

If you make one, feel free to post a photo on the September Girls Do So Much fan page!

DIY #15
♥ I worked really hard on this tutorial. It took a long time to prepare.
I wrote out these instructions and took the photos.
So if you see this anywhere else, it's not the original.
I was inspired by other versions made by awesome users at sites like craftster.
I made my skirt in the summer of 2008, but I posted this tutorial on
8/26/11