 reblog on tumblr
 reblog on tumblr
e a s y ][ 1-2 hours
cost: $10 range
shop at: your house, your freezer, craft store
read: the instructions once though before you get started.
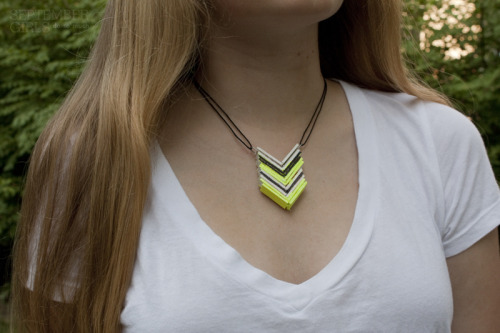
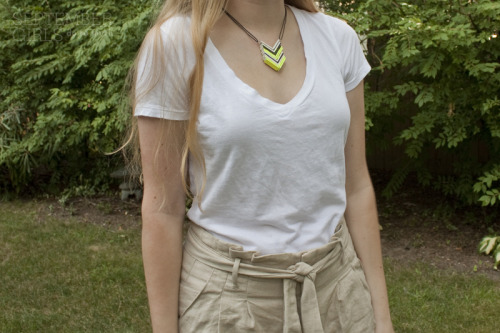
Myself, and a lot of other people apparently, have been keen on chevrons lately. So, how can one be on trend while enjoying summer treats at the same time? Here's the answer.
SUPPLIES
- 10 popsicle sticks
(from popsicles you've eaten, or fresh ones from the craft store)
- 2 paperclips
- pencil
- ruler
- scissors
- hot glue gun
(or another type of sturdy glue you have handy)
- newspaper or junk paper for spilling glue and paint on
- string or chain/jewelry making bits
optional supplies:
- sand paper
- box cutter or xacto knife
- white paint
- colored paint
- paintbrush
- sharpies
0. Soak the popsicle sticks in warm water for 5 minutes. This makes them easier to cut. If you're using popsicle sticks from actual popsicles, add a few drops of dish soap, as this also cleans them. Pat all of the sticks with a paper towel to get rid of excess moisture.
1. Measure three 1 inch sections on each stick, and mark. Be sure to trim off the rounded ends as well.

2. Cut the sticks using scissors. Sometimes it helps to go over your marks with a box cutter before you use the scissors. Don't worry if you mess up a few cuts, 10 sticks gives room for mistakes.

3. If you have sand paper, this is a good time to sand the edges where you cut. For both sides of piece, I ran it over coarse and then ran it over fine grain.

4. Once the pieces of popsicle stick have dried a bit more, apply white paint to the edges. This is especially helpful if your sticks are stained from, well, obviously, popsicles.

5. Using the hot glue gun, create an "L" shape with two of the stick pieces.

6. Applying more hot glue, layer on another piece.

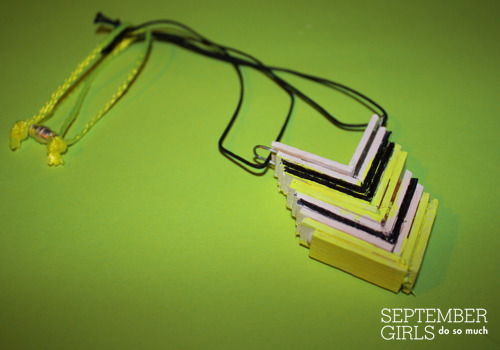
7. And another. You are essentially creating lots of "L" shapes that nest into each other, so keep an eye on how you position them. Don't worry about being perfect, this necklace's look lends well towards the organic feel.

8. Continue layering until it is just about the right height. I used about 8 sticks' worth.

9. Glue two paper clips to the top. (This is where you'll attach the string)

10. Then, layer on the last two stick pieces. Let the pendant dry, carefully picking off any weird bits of glue.

11. You can use paint or sharpie to add a bit of zip to your necklace. Play around with string or chain and presto, you have a necklace! (Make sure it fits around your head and neck!)
 reblog on tumblr
TIP: Hot glue works best when you let it heat up for a few minutes. If you use it too soon, it's in this weird state where it clumps and dries too quickly. Always work on a surface like newspaper, where it is ok to spill and drip. Also: seems dumb, but it gets really hot, which is hard to believe until it lands on your fingers. Speaking from experience here, haha.
ALTERNATIVE IDEA: Plain unpainted wood has a nice look to it, as it puts the focus on the form of the necklace. But, as always, color creates a nice effect if you pay attention to spacing and what distance people see the necklace from. Lots of colors together can look epic up close and then when you step back it can look muddy.
Be sure to check out my other projects!
If you make one, feel free to post a photo on the
September Girls Do So Much fan page!
DIY #18
♥ I worked really hard on this tutorial. It took a long time to prepare.
I wrote out these instructions and took the photos.
So if you see this anywhere else, it's not the original.
7/18/12