
BELT-HEADBAND-NECKLACE-BRACELET
aka the "BHNB"
m e d i u m ][ 1-2 hours
cost: $10-15 for several
shop at: your house, a craft store, hit up sales if you can
read: the instructions once though before you get started or buy supplies
The BHNB is really handy, you can wear it a bunch of different ways. It's easy to pack for trips, and adds interest to even the simplest outfit.
SUPPLIES (mix and match to your liking)
STRING
- hemp
- suede cord
- leather cord
- regular ol' hardware store or kite string
- embroidery floss
- thin ribbon
- fabric strips
- really, any string you like
BEADS
- pony beads
- plastic beads
- wooden beads
- natural beads
- metal beads
- really, any beads you like
TRINKETS
- 1/2" or bigger jump rings (usually come in gold or silver)
- charms
- little jump rings to hold charms (optional)
- feathers
- elastic hair tie
BASICS
- workspace
- background music
- scissors
- tape
- liquid glue (like elmer's)
- ability to braid and tie knots
PLANNING + ADVICE ABOUT MATERIALS
- Think about what colors you want to focus on. I find that 1 to 4 neutrals mixed with 1 to 4 colors looks interesting yet well-thought out. I picked browns, whites, blacks, gold, blues, greens, and yellows. Every material I used was one of those colors. However, if you want a rainbow, or you want everything to be one color, go for it!
- You can get lots of variety for less money by buying bags of cheaper beads with multiple colors in them, followed by a few strands of special beads. The special beads will look even nicer with smaller/plain beads next to them.
- Play with size and texture. Tiny metal beads will look rare next to bigger wooden beads, as would shiny next to dull. Give the eye lots to look at within a few basic string and bead choices!
- Don't overdo it with the beads, the BHNB is going to feel heavy if there's a pound of beads on your head or around your neck.
- Make sure at least one kind of string you get is small enough to go through the smallest bead's hole.
- Make sure all of your beads are small enough to fit through your biggest jump ring.
- If bigger beads keep falling over your knots, put a little bead after the big bead, then tie the knot. That should keep it in place.
- Thicker string makes for a more durable/thicker final product. If you use only embroidery floss for the braid, it's going to end up being a long, thin friendship bracelet.
- Avoid itchy string. I have yet to come across an itchy bead.
- Don't write off cheaper materials right away. I fell in love with boring hardware store string, because it's durable and you get a lot of it to play with on one roll!
- Get long enough pieces of string to go around your hips, plus some. The extra is where the beads go, and where you tie knots/close it.
- Braids don't have to be just 3 pieces of string. Pair smaller strings together and braid it like it's one string.
- Use tiny beads or knots to space out your bead layout
- Buddy up beads of the same color or size to create new shapes
- Not every end piece has to be covered in beads. Bits with no beads create a breather for the eye and make the beaded parts pop!
- Odd numbers look more appealing than even, symmetry is boring
- Don't worry about assembling this perfectly! Rough edges, loose strings, and awkward knots give it character.
THE BASIC OUTLINE OF HOW TO MAKE IT
Knots can be un-tied and re-tried.
Don't be afraid to play around and experiment, that's how you discover cool ideas!
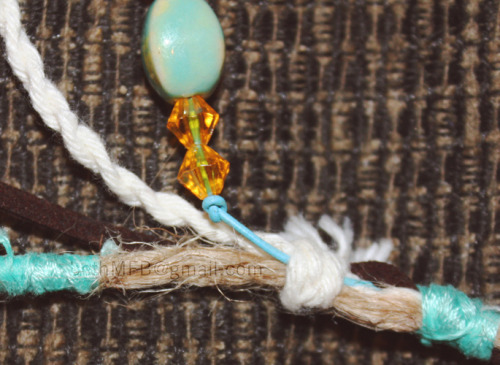
1. Pick out the three strings you want to braid. Bundle them up and tape them at the top, to a table or other surface edge. Leave a few inches at the top before where you start the braid. This is where beads and decorations will go later.
2. Braid until you get near the end. Stop, and leave a few inches at the end. More beads will go there.

3. Instead of tying knots at both ends, grab 2 lengths of scrap string, 6 or 7 inches each. Knot one where you'd like to secure the braid at the top, and wrap it tightly around the braid, again and again. Pull it through one loop to finish the wrap. Dab with glue to secure it further. Repeat at bottom. These wraps also make great decorative elements.

4. On one end, tie two of your big jump rings to one end of the braid, right next to each other on the same loop.

5. On both ends, place beads and other decorations, using knots to keep them in place.
6. Slip an elastic hair tie on one side of the BHNB. Wind it multiple times like when you make a ponytail. Touch up glue and inspect/edit your work.
7. Done!
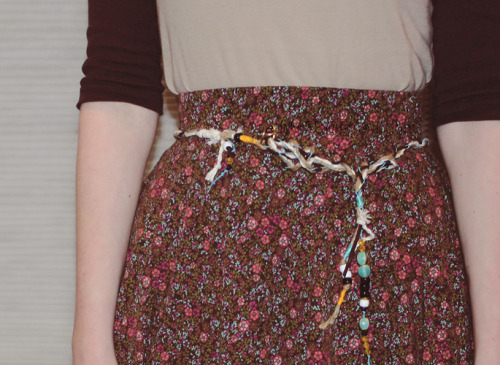
BELT
- The big jump rings you attached allow for an extra way to secure the belt function.
- If you've ever had a preppy ribbon belt, you know how this works. Hold the belt around your waist. The other end of the BHNB goes through both rings, then back through the bottom loop.
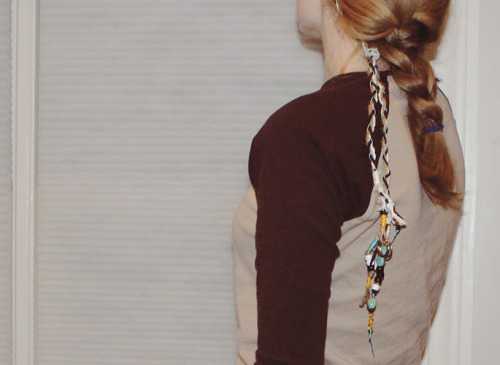
HEADBAND
- Wrap it around your head however many times you want, and tie a knot to secure it, or utilize the elastic or jump rings.
- Wear it like a traditional headband, or wear it around your forehead the "hippie/rockstar" way
- Let the beads hand loose or tuck them in
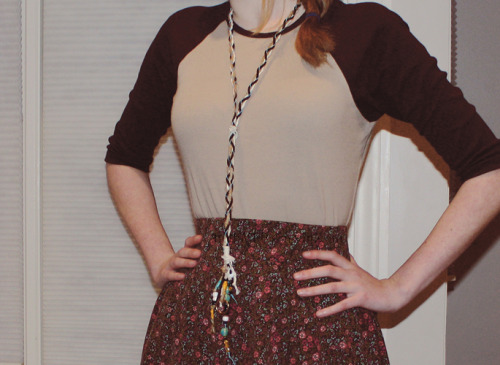
NECKLACE
- Swoosh it around your neck, then tie a loose knot or push the other end through the elastic
- Place the knot near your neck, in the middle, or near the end
- Hang the ends next to each other evenly, or let one hang above the other
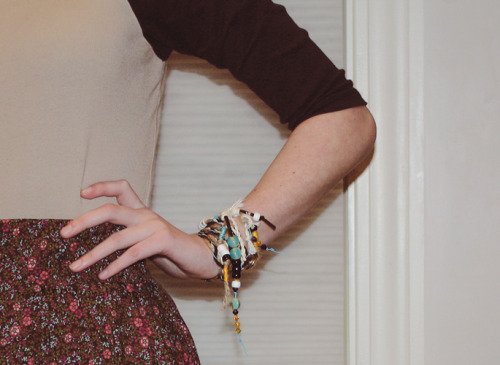
BRACELET
- Wrap and wrap and wrap it around your wrist, pushing it through the rings or not, securing it with a knot, a tuck, or the elastic
- Loose or snug, your call
ALTERNATIVE IDEAS:
- Recycle old jewelry and weave it into the project. I bet broken bracelets would look cool alongside the beads, or old rings instead of jump rings.
- If you're feeling adventurous, slip beads onto the braid as you braid, making them part of the rope. Just keep in mind whatever is part of the braid will be in contact with your skin or hair. I decided against doing this since I hate having little bumps pressed against my skin, haha
- Use the BHNB as ribbon around a gift for a friend…bonus gift!
be sure to check out my other projects!
all these photos are on my tumblr if you want to reblog.
DIY #13
♥ I worked really hard on this tutorial. It took a long time to prepare.
I wrote out these instructions and took the photos.
So if you see this anywhere else, it's not the original.
2/1/11


