Showing posts with label sewing. Show all posts

26 August 2011

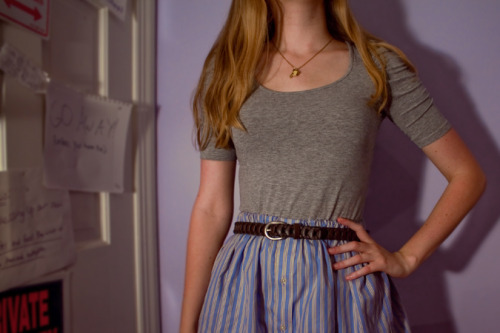
DIY: shirt skirt


reblog on tumblr | hype on lookbook

m e d i u m ][ 1-2 hours
cost: $4 for thread & elastic
shop at: your house, craft or fabric stores
read: the instructions once though before you get started. also consider referring to my Le Sac Dress tutorial, as it uses similar techniques.

The perfect use for an old button down shirt from your boyfriend, lover, the kid across the dorm hall who you harass, OR good ol' dad, or grandpa joe. Or sketchy Uncle Goodwill.

You only have to know how to sew a straight line. Plus, you don't have to hem this skirt! Yesss. And it's a great unique shape. Side slope!

I wear this one like I wear my elastic high waist skirts, at my natural waist with a shirt tucked in.

SUPPLIES
- button down shirt in a male size, hopefully it has some length to it
- sewing machine that can do a straight stitch OR be tough & sew by hand
- iron
- scissors
- ruler
- safety pins
- package of 1/2 inch elastic
- thread in a color that goes with the shirt

1. Button all the buttons. Cut straight across both layers of the shirt, under the sleeves. Do not try to cut through a button.


2. Now you have the bottom of a shirt. Stitch down the placket, buttons rightside up. This prevents awkward gapping when you wear the skirt. Only sew the top layer of the shirt. Do not stitch over buttons, the needle will break. A broken sewing machine is a sad one.


3. Lay the shirt tube on an ironing board, wrong side out. Fold & iron the top edge of the shirt down so it makes a 3/4 inch skinny rectangle around the top of the tube opening. This will be the tunnel where the elastic goes. Pin it down & it'll stay in place better.


4. Using a straight stitch, sew around the circle close the lower edge, but do not sew it shut completely. Leave a 1 inch opening. The gap is where the elastic will enter. Keep an eye on things and check your work every so often, so you don't accidentally sew through both layers of the skirt!


5. Cut a piece of elastic a few inches shorter than your waist. For instance, if you have a 26 inch waist, cut a piece that is 21-23 inches. Styles of elastic vary, so you may have to tinker with it again later to get the right fit.

6. Attach one end of the elastic to a safety pin. Pin the other end somewhere near the tunnel, so it will not get lost in the tunnel. Push the elastic through the top fabric tunnel. It will gather and make cute little bunches. Take your time.


7. When the elastic meets, remove the safety pins carefully, make sure the elastic is not twisted, and sew the ends together. Go over it multiple times.


8. Try on the skirt to see if it fits. The elastic should feel snug but not painfully tight. Re-sew the elastic tighter if needed.

9. Tuck the elastic fully into the tunnel. Sew the fabric tunnels shut along the bottom edge where the other stitches are, going over it a few times.

10. Turn the skirt right side out, and you're done!


TIP: I like to leave the seam tag hanging as a bonus "this used to be a shirt!" detail. But you can cut yours out if you like.

ALTERNATIVE IDEA: This tutorial could be modified to make a top, or plenty of other things, depending on what kind of shirt you use. Cook up some ideas of your own, if you feel like it!

Be sure to check out my other projects!

If you make one, feel free to post a photo on the September Girls Do So Much fan page!

DIY #15
♥ I worked really hard on this tutorial. It took a long time to prepare.
I wrote out these instructions and took the photos.
So if you see this anywhere else, it's not the original.
I was inspired by other versions made by awesome users at sites like craftster.
I made my skirt in the summer of 2008, but I posted this tutorial on
8/26/11

13 January 2011

DIY: le sac dress


kinda d i f f i c u l t ][ 2-3 hours
cost: $10-20 depending (compare to $38-$48 at american apparel)
shop at: fabric stores (Jo-ann Fabrics, or search Google for local shops)
read: the instructions once though before you get started

This super versatile dress is mad fun to play with.
I hope the pictures help, it's hard to explain sewing via words.
This dress is literally a rectangle. If you've ever sewn a drawstring backpack, it's very similar!

SUPPLIES

- sewing machine that can do a straight stitch OR be tough & sew by hand
- iron
- scissors
- ruler
- pins
- big safety pin
- 1-1.5 yards of knit jersey fabric (t-shirt material for the body, make sure it's not too heavy or see-through)
- 1/3 - 1/2 yard of cotton fabric (for the string; you can expand to other types later, in the meantime, cotton is great for beginners, less fuss, plus it comes in fun prints!)
- thread in a color that goes with/matches the knit jersey fabric
- basic understanding of sewing machine or someone who can help you

1. For the body, decide your length & width. I made mine with 21" x 31" pieces for a short, slim fit. You know your size, so go from there. To play it safe, always make it a little bigger. Cut your size rectangles out of the fabric. You can always tweak it later, or make a second dress in a new size.


2. Fold the sides of the rectangle inward, about the first 7 inches at 1/2 inch on both sides on both body pieces. Pin down. Stitch down.


3. Fold the top of the body piece inward 1.5 inches. Pin down. Stitch down all the way across, near the edge. This is the tube for the string to slide through. Repeat for other body piece.


4. Right sides together, pin the rectangles to each other. Stitch (or overlock, if you have a machine) the sides all the way down, but do NOT stitch up the arm holes or top tube.


5. The String: use iron to create tidy creases. See visual aid. It's just a bit of folding & stitching. Use pins to help it stay put.


6. Push the finished string through the two tubes. Attach a safety pin (or profesh pull tool) to the end to make it easier.


7. Done! Try it on & play with different arrangements you like. Prepare to get compliments. :]

SEWING TIP: when you start stitching, go back and forth over the first 3-5 stitches to reenforce the strength. Do the same thing at the end of a line of stitching before you cut it off the machine. Don't be afraid to pull out your stitches and try again if you run into problems.

FABRIC TIP: some knit jersey comes in a tube, so you can skip the sideseams! just cut slits/stitch the arm holes & top tubes for the string.

ALTERNATIVE IDEAS: use any fairly lightweight fabric for the dress body; just be careful with obvious wrong & right sided fabrics. You wouldn't want the white on the outside & the flowers on the inside. // use ribbon or other strong string instead of making your own. keep in mind it will be tugging at your neck. make sure it's not itchy!

SIZE ISSUES: If your dress is too small or too short, you can wear it as a skirt or top! See links below for info.
Or if it's a total disaster...sew up the bottom and use it as a bag or...an umbrella case? haha. & try again. :]

How to Wear & Other Details:
AA Dress Page: http://store.americanapparel.net/rsa0300.html
AA's Youtube, with dress-arranging videos: http://www.youtube.com/watch?v=pq-J_3a5pSw&feature=related

be sure to check out my other projects!

DIY #2
♥ I worked really hard on this tutorial. It took a long time to prepare.
I was obviously inspired by American Apparel.
but I came up with the instructions & drew the sketches & took the photos myself.
So if you see this anywhere else, it's not the original.
original polyvore post date: 8/15/09