
reblog on tumblr | hype on lookbook
e a s y ][ 1-2 hours
cost: $10-20
shop at: your house, craft or fabric stores
read: the instructions once though before you get started.
Fringe is a really fun effect but I imagine it can be kind of intimidating if you've never tried it before. I promise this is a super easy project with big results, and would be fun by yourself, or with a group! It's also mildly eco-friendly, as each shirt is made from just one shirt, and minimal supplies, with very little waste.
SUPPLIES
- light colored t-shirt that's at least little too big for you.
(most craft and fabric stores have tees in youth and adult sizes)
- fabric glue
(beacon fabri-tac is a good brand)
- fabric markers or sharpies
- ribbon
- scissors
- ruler
- pencil
- piece of cardboard
(newspaper or a notebook would work too)
- flat space to work
1. Plan what colors you want to use before you buy supplies. The shirt I found in my house was light pink, so I decided to use pink and orange fabric markers, and pink and orange ribbon. I think fewer colors show off the fringe, but if you're color crazy, do your thing. Or, if you're not color crazy, you could even skip the steps about marker and/or ribbon. If you don't like fringe, this isn't a project for you. But maybe a friend or relative would like one?

2. Cut any tags out of the shirt.Try on the shirt and mark where your belly button is with a pencil. Take off the shirt and lay it flat. I recommend that you cut off around 4" from the bottom of the t-shirt. Four inches allows for pretty good looking fringe, but if that makes the tee too much of a belly shirt, or you want to play with fringe length, adjust as you like! The more you cut off from the bottom, the shorter the shirt will be.

3. Set the main part of the tee aside. Grab the bottom piece and place it in front of you, with the seam at the top. Using the fabric markers, add stripes of color to both sides. They don't have to be perfect, texture and randomness is a good thing here!

4. Cut lines every 1/2" along the piece, all the way across. You can wing it, or draw lines with a ruler and pencil. Pulling down on the 1/2" strings will cause them to roll, creating the awesome fringe effect.

5. Cut the fringe into two pieces, where the sides of the t-shirt used to be. You should have something that looks like this:

6. Now to create the chevron. Grab the fringe piece you want to use on the front of the shirt. Fold it onto itself, color facing in.

7. This part is a bit tricky, but take your time, you'll get it! Practice with a strip of paper if you need to. Fold it back flat, creating a little triangle behind it in the center.

8. The whole piece should look like the edge of an obtuse triangle. Put fabric glue in between the center's folds and let it dry for a bit. Then, pin the fringe where you want it to be on the shirt. Try it on to get a better visual. You can hold up the fringe and mark the shirt if you don't have pins.

9. Slide a piece of cardboard into the shirt to keep the glue from going everywhere. Trim the ends, remove the pins. Apply glue to the back of the seam to attach the fringe to the shirt, keeping an eye on placement. Once it's on there, press it down.

10. Using the same folding and gluing techniques, you can attach ribbon to the shirt.

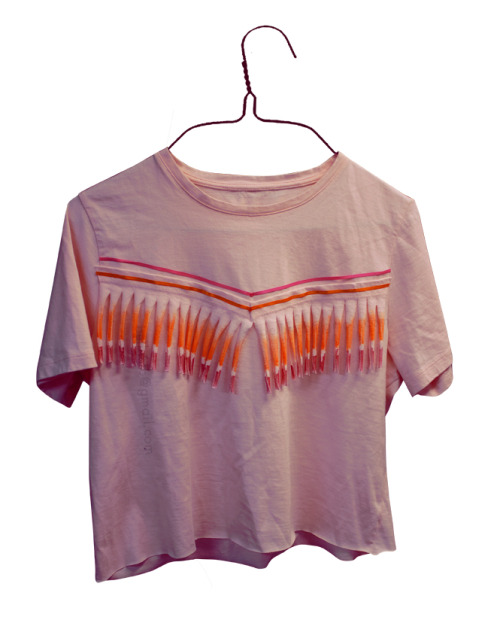
11. I used the extra fringe and ribbon on the back of my shirt. I decided to put a straight line higher up, but you could do another chevron.

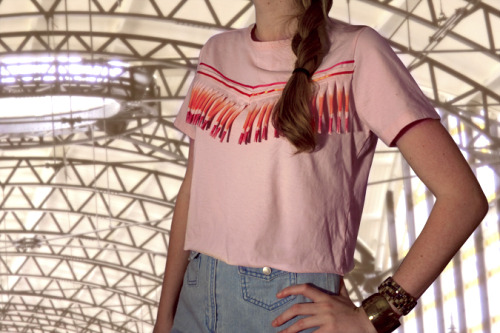
12. Done! Time to find some breeze and put your fringy tee into action!
TIP: Fabric glue is perfect because once it dries completely, it's machine washable. If you're feeling fancy, you could definitely sew instead.
ALTERNATIVE IDEAS: If you use a tee that is way big, you'll get a cool drapey poncho look. You could also play with cutting the neckline or sleeves, all the usual things that happen when you put scissors near a t-shirt.
Be sure to check out my other projects!
If you make one, feel free to post a photo on the September Girls Do So Much fan page!
DIY #16
♥ I worked really hard on this tutorial. It took a long time to prepare.
I wrote out these instructions and took the photos.
So if you see this anywhere else, it's not the original.
8/30/11
Ah, this is so cute!
ReplyDeleteThis is so cute! I really love all your tutorials, this blog is really awesome :)
ReplyDelete