
e a s y ][ under 1 hour per bracelet
cost: $10 or less, for lots of bracelets
shop at: your house, a craft store
read: the instructions once though before you get started
This project is easier if you have a lot of fabric scraps from past sewing projects. And experience with basic braiding/tying bows. It's easy because you can be sloppy and it will still end up adorable.
I saw these bracelets selling on a brand's website for $9.50 each, and I was like…haha, no way, something so rough not worth that much dough. BUT THEY'RE SO CUTE.
SUPPLIES
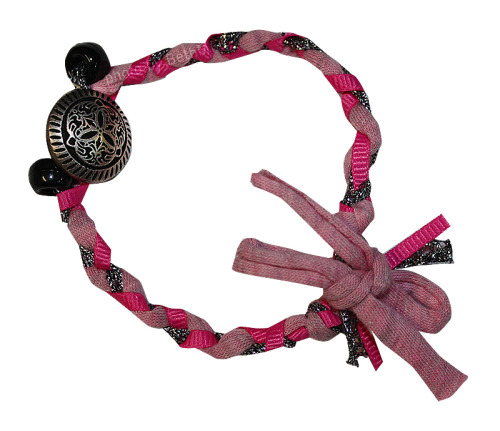
- scrap cotton fabric
(t-shirt material will work too, however, the edges won't fray)
- beads with big holes or charms/shiny buttons
- needle + thread
- scissors or other cutting method
- masking tape
- clear nail polish (optional)
1. Cut 1/2 inch (3/4 if it's t-shirt fabric) x 20 inch strips of fabric. You'll need 3 strips for each bracelet.

1a. 30 strips will get you ten bracelets, for example. I like getting cutting over with so sometimes I do a lot at once. Wait until you've gotten the hang of the process before you do that, though!
1b. If you can't find scraps that are 20 inches long, knot together shorter strips. Knots will add character, and you can mix up what patterns you use! Bonus qualities!
2. (tightly) Knot the 3 strips together at one end, leaving 5 inches above the knot.

3. Tape the knotted strips to something that won't move, like the edge of a table, book, tray, close to where you are sitting. Avoid attaching to people or animals unless they promise to sit still. x)

4. Braid tightly, don't strangle it but make sure things stay in place.
5. Stop braiding once you have enough braid to go around your wrist. (or whoever's wrist this is for!) Braid a little extra if you want it to be lose.
6. (tightly) Knot where the braid ends.
7. Slide a bead to the center, or use a small scrap of fabric (or thread) looped through the decoration to tie it to the bracelet.

8. Choose the most durable strip of the 3. (for example, if your three strips are cotton, lace, and chain, choose the cotton) This will be the closure and bow.
9. On both ends, trim the other 2 strips. Cut slightly away from the knot, (leave 1/2 inch or so) you don't want anything coming undone later.

10. Tie a bow with the durable strip. Dab the ends with clear nail polish if you'd like, to keep the threads in place.

11. Wear it! (or make more)
TIP: If you don't have fabric scraps around your house already, buy quilting squares. They're small samples, available at most fabric stores. You can get lots of prints quickly without buying a lot of fabric this way.
fabric strips combo guide!
3 random prints = quirky
3 similar colored prints = refined quirky
1 print + 2 solids = print will pop
2 of the same print + 1 solid = print will shine
2 prints + 1 solid = solid acts as a breather
1 print + 1 neutral print (two color stripe, tiny polkadots, tone on tone, etc) + 1 solid = mixed medley
ALTERNATIVE IDEAS: Instead of braiding 3 fabric strips, use 2 fabric strips and 1 string of something small and shiny that's ready to go.
ideas: plastic pearl strings, broken mardigras necklaces, chains, lace, thin metallic ribbon. Look around the fabric or craft store, they're bound to have something silly that would look fab woven into your bracelet next to fabric.
LOVABLE CHEAPSKATE VARIATION: You could also cut strips of plastic shopping bags (or even sandwich bags) to use in/as your bracelets. Just adjust the size to 1 inch (or 1 1/2 inch) by 20 inches. Thin strips of paper bags might work if you're feeling adventurous.
[feel free to use my photos! but please give credit, and don't edit w/o asking. If you make bracelets of your own, send me a photo!]
be sure to check out my other projects!
DIY #9
♥ I worked really hard on this tutorial. It took a long time to prepare.
I wrote out these instructions and took the photos.
So if you see this anywhere else, it's not the original.
12/27/10
really cute, definatly will try this later :D, saw it on your polyvore :D
ReplyDeleteLike
ReplyDeletekinda confusing /:
ReplyDeleteif you don't know how to braid, check google for tutorials (: best of luck!
ReplyDeleteif you don't have fabric, could you also cut up old t-shirts?
ReplyDeleteyes, you def could!
ReplyDeleteTHIS IS FRICKIN AMAZING!!!
ReplyDeleteI LOVE YOU